this is a continuation of Maya 2017 render layers for busy people, which plans on covering the "collections" inside the render set up window.(in case you have no clue what "collections" are, click here)
This article addresses the bellow topics
- creating collections and sub collections
- understanding collection memberships
- populating / filtering collections
Creating collections and sub-collections
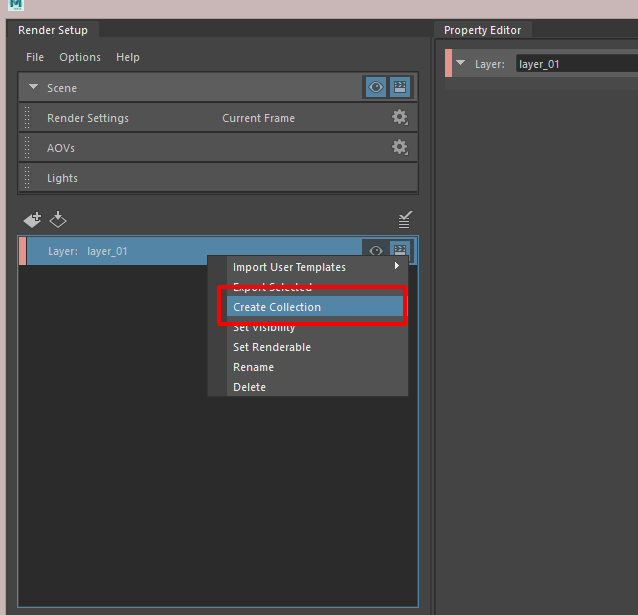
Right click on the layer and select "create collection"
If you create any objects while you are viewing the scene from a specific layer other than the scene(master) layer, Maya will create a new collection with the name "_untitled_" for that objects.
Since we like to keep our scene files neat and human friendly, I would advice not use this method to populate a collection.
sub-collections
Each collection can have multiple sub collections. right click on a collection and click on "create collection" to create a sub-collection.
This is useful when we need to filter out objects or nodes in an existing collection for different purposes. we will address this in detail when talking about populating collections.
understanding Collection membership
When an object or node is added to the collection, it is considered as a member of the collection.
In the above pic "|object_A" is a manually added member, the "|" in front of the name represent that it is a child of the main scene(root). If we add the "pCube1" which inside the "group2" to our collection, then the name would be "|group2|pCube1"
The connection between the object and the collection membership is not created using the name of an object, instead ,it is connected using the UUID of the object. Therefore you can change the name of the object after adding it to a collection with out breaking the collection membership.
But the membership will break if you change the hierarchy of a member object, and it is indicated by a missing member alert  on the collection and its parent layer.
 on the collection and its parent layer.
example: If we take a look at the missing member (ie. "|object_B" ) in the drag and drop area , the layer system cannot find it because it has been moved to "group2".
populating / filtering collections
Once a collection is selected, middle mouse drag-and-drop objects in to the add to collection area(green area) or select the objects on the view port and press "Add"(red) in the render set up window.
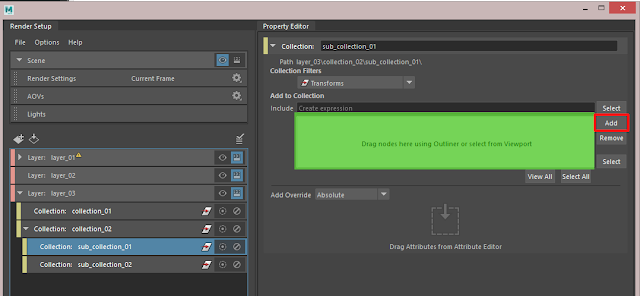
To remove an object from a collection, right click on the object in the drag and drop area and chose "remove selected" from the drop down menu.
This is the fastest way to drop your objects in to collections, especially when you are working on small less complex projects.
However when it comes to complex projects dragging and drooping each node would be tedious and harder to manage across multiple scenes. This where automatic population comes in handy.
Automatic population method (expression based)
A collection can be populated based on the name of the object or its hierarchy name(case sensitive),by typing the name of the objects with a "*" on the create expression area(red). After that you would not see any objects being added in the add to collection area, and this is normal as the expression works dynamically.
To check the members of the collection, click on the select button(green) , which will select all the member objects on the view-port and the outliner.
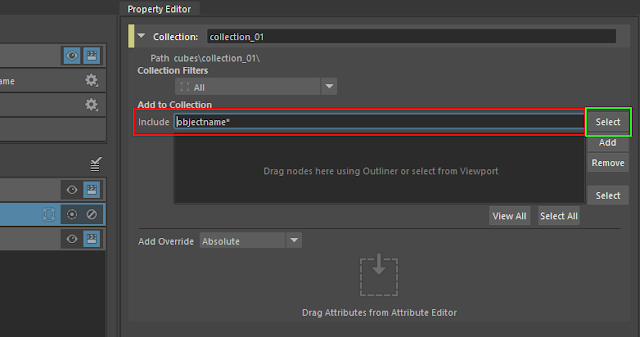
Few useful commands which can be used in the expression area :
"*" - wild tag, can be added to both front and back of the name
";" - defining the end of expression line
"," - use as a + or a combine command
"-" - exclusion command
Lets look at some examples:
example 01 - In this scene we need to add all the objects that starts with the name "pCube" to the collection.
expression: pCube*
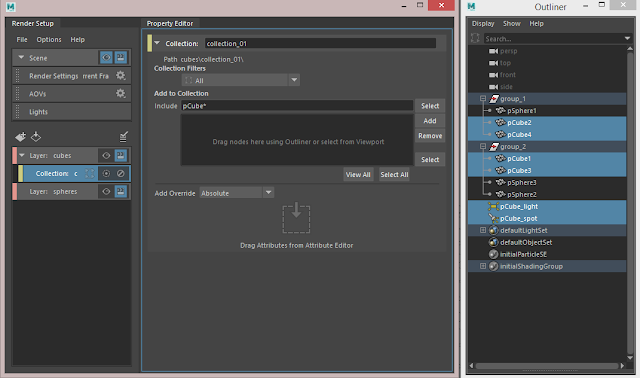
example 02 - In this scene we need to add all the objects that starts with "pCube", and the objects in "group_1".
expression: pCube*,group_1
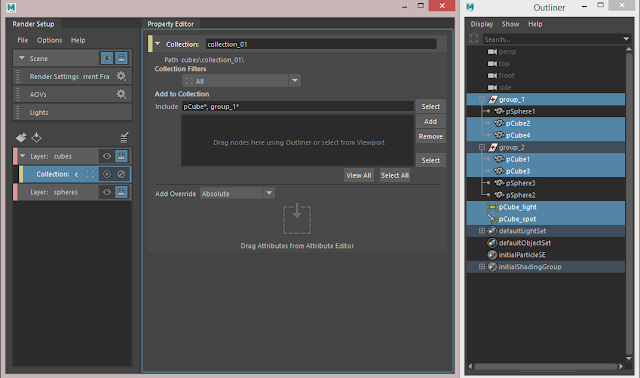
example 03 - In this scene we need to add all the objects that starts with "pCube", the objects in "group_1" and exclude the objects that has "light" in their name
expression: pCube*,group_1*; -*light*
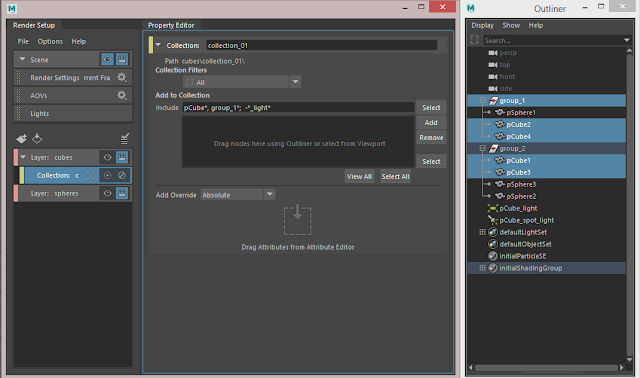
If you need more information about the expressions please click here (maya help).
In this article I mainly focused on "Collections" in Maya 2017 render setup. It is a continuation of my previous article intro to render setup window in Maya 2017. Therefore if this article was useful, please feel free to share your thoughts and ideas about the article in the comments below.
And also If you have any confusion or doubt related to rendering in Maya please leave a comment below . Hope to see you soon in my next article.
Cheers!! :)




.jpg)


